This article based on my experience and it provides step by step to install VMware Tools in an Ubuntu virtual machine.
On your fresh installed Ubuntu, you will be suggested by VMware to install VMware Tools. To install it, you must mount the VMware Tools CD image, extract the contents (VMware Tools), and then run the installer. If you are running on Ubuntu desktop version it will be more easier because VMware Tools CD image will automatically mounted in virtual CDROM.
In this case, we are talking if we installed Ubuntu server. There is no GUI (Graphical User Interface) in a fresh install, so all the whole things we do in Server Edition are trough CLI (Command Line Interface). There is several packages to be installed before we can use folder sharing feature.
Make sure you are connected to internet and follow this steps:
STEP 1
Log in to your Ubuntu console and type "uname -a".
STEP 2
Using the version information given, type "sudo apt-get install build-essential linux-headers-(version)" and type your password.
STEP 3
Right after completed, type "mount /dev/cdrom /mnt/cdrom". If an error given, then try "mount /dev/sr0 /mnt/cdrom". Then type "ls" in /mnt/cdrom folder.
STEP 4
If it has mounted successfully, extract the .tar.gz file in /tmp folder.
Type "tar -zxvf /mnt/cdrom/vmwaretools-(version).tar.gz /tmp"
STEP 5
Go to /tmp folder and type "cd vmware-tools-distrib/".
STEP 6
Then run the installer. Type "sudo ./vmware-install.pl -d" and type your password.
Where -d assumes to accept the defaults option.
STEP 7
Done. Restart after once completed. Type "sudo reboot".
If you are not connected to internet and have DVDs repository, then try this steps:
STEP 1
Edit your repository list. Type "sudo nano /etc/apt/sources.list"
STEP 2
Enable cdrom repositories by deleting # infront of deb cdrom: and insert your first DVD.
STEP 3
Then update repositories, type "sudo apt-get update".
Once completed, type sudo apt-get install build-essential linux-headers-(version)". Change your DVD to another one if required.
NEXT
Follow STEP 4 to STEP 7 mentioned in the previous instructions above.
Showing posts with label tips. Show all posts
Showing posts with label tips. Show all posts
Tuesday, February 25, 2014
Wednesday, January 15, 2014
Cara ganti tone BBM di iPhone
Bosan dengan nada bbm di iphone kamu? Atau gak denger kalo ada chat di bbm? Ganti aja tone bbm kamu. Apaaa? Gak bisa diganti karena gak nemu setting ganti tone-nya?
Coba pake cara lama gan! ganti file audionya :LoL
At least....it's work!


[1]. Buka iFile > /var/mobile/Applications dan cari folder yg berisi BBM.app
[2]. Buka folder BBM.app
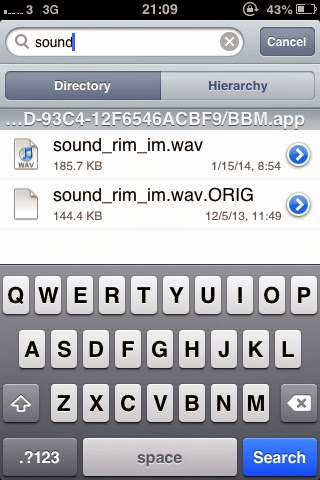
[3]. Cari file namanya sound_rim_im.wav
[4]. Ubah nama file .wav tadi menjadi .wav.ORIG
[5]. Copy file .wav yang sudah kamu siapkan ke folder BBM.app, dan ubah nama filenya menjadi sound_rim_im.wav
6. Selesai. Sila coba bbmnya, klo belum bisa direstart dulu iphonenya..
Semoga berhasil! ^_^
Subscribe to:
Posts (Atom)